

Guide to Connect Your Static Site with ENS Domain
Harnessing the Power of ENS Domains and Spheron Network


ENS (Ethereum Name Service) domains provide a decentralized naming system on the Ethereum blockchain, contrasting the traditional DNS (Domain Name System).
They both serve the same fundamental purpose: utilizing domain names to map intricate addresses. However, the distinction lies in their approach. DNS translates domain names into IP addresses, while ENS employs .eth domain names to reference Ethereum addresses, IPFS file hashes, or Tor .onion addresses!
Imagine facing the challenge of remembering a long 42-character hexadecimal ETH wallet address like “obn786df3dnd1204422…” in favor of an ENS domain like example.eth. This substitution streamlines transfers via ENS-compatible wallets, sidestepping the need to type the exhaustive hexadecimal string.
But ENS domain names extend beyond mnemonic wallet addresses or quick access to IPFS-hosted images. ENS propels websites, Dapps, and an array of Dweb resources into the realm of accessibility through a decentralized, censorship-resistant domain naming system governed by users.
Unlike DNS's centralization, ENS thrives within Ethereum smart contracts, ensuring resilience against censorship. This blog explores ENS's power and guides you through connecting your ENS domain to a Static Site on Spheron Network And taking advantage of the power of decentralization.
ENS Domain vs. DNS
Feature | ENS Domain | DNS |
Centralization | Decentralized | Centralized |
Ownership | Owned by the user | Owned by a registrar |
Security | More secure as it is not controlled by a single entity | Less secure, as a few large organizations control it |
Scalability | Can scale to meet the demands of the growing Web3 ecosystem | It can be slow to scale, as it is reliant on a large number of DNS servers |
Flexibility | More flexible, as it can be used to name a variety of Web3 resources, such as Ethereum addresses, NFTs, and decentralized websites | Less flexible, as it is primarily used to name websites |
Advantages | Decentralized, immutable, censorship-resistant, user-owned and controlled | Centralized, mutable, vulnerable to censorship, not user-owned or controlled |
Used For | Decentralized websites and apps, Dapps, DeFi, NFTs, DAOs, wallets, IPFS | Traditional websites |
How to Buy and Register ENS Domains?
You may skip this section if you have already registered your ENS Domain. If Not, then follow the steps below.
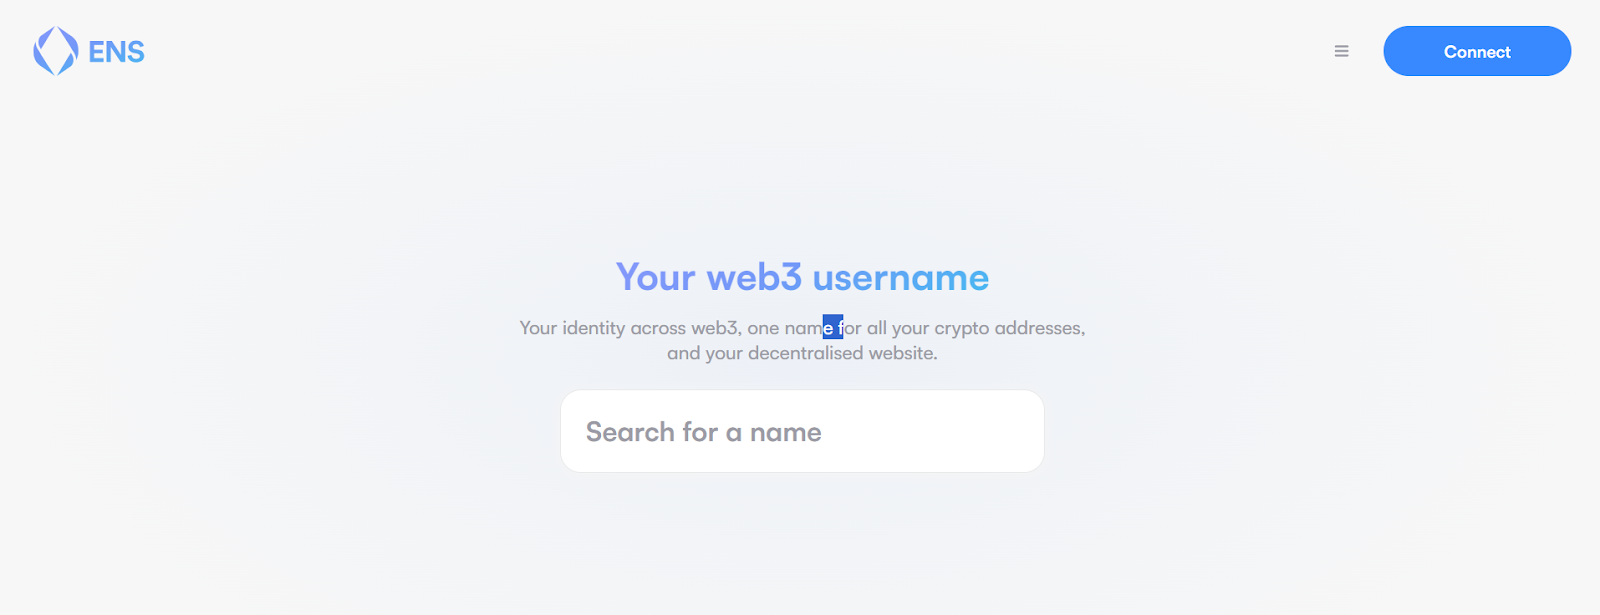
- To claim your first ENS domain, head to the Ethereum Name Service application and enter the address or name you'd like to register in the search bar. Make sure it's at least three characters long (there's no upper limit), and you can include emojis.
2. To complete the registration process for your ENS domain, you'll need to connect to the main network by selecting one of the available integration options for the wallet, such as MetaMask, WalletConnect, Rainbow, Coinbase Wallet, Ledger Live or Argent. For this example, we'll use MetaMask. This connection will allow you to pay the registration fee and officially claim ownership of your ENS domain.

3. Next, You can choose how long you want to register for. The minimum is usually a year, but there's no maximum limit. Do note that the gas fee remains the same regardless if you register for one year or 10 years.
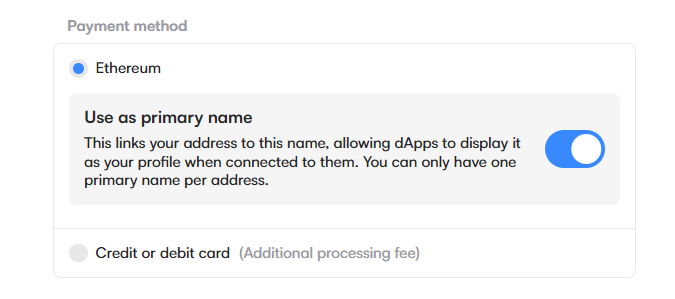
You get the option of credit and debit cards to pay the fee. But for example, we are using a meta mask, so Click "Connect". A box should pop up from MetaMask, and select the preferred gas fee. You can leave it to default settings (Average). Click "Confirm" to approve the transaction.
4.After initiating the registration process, remain on the page and allow the system to complete the necessary steps. This may take a few moments, so please be patient.
Once the registration process is underway, wait an additional minute to ensure no other party attempts to claim the same name. You can monitor the progress of your registration through a green bar displayed prominently on the screen.
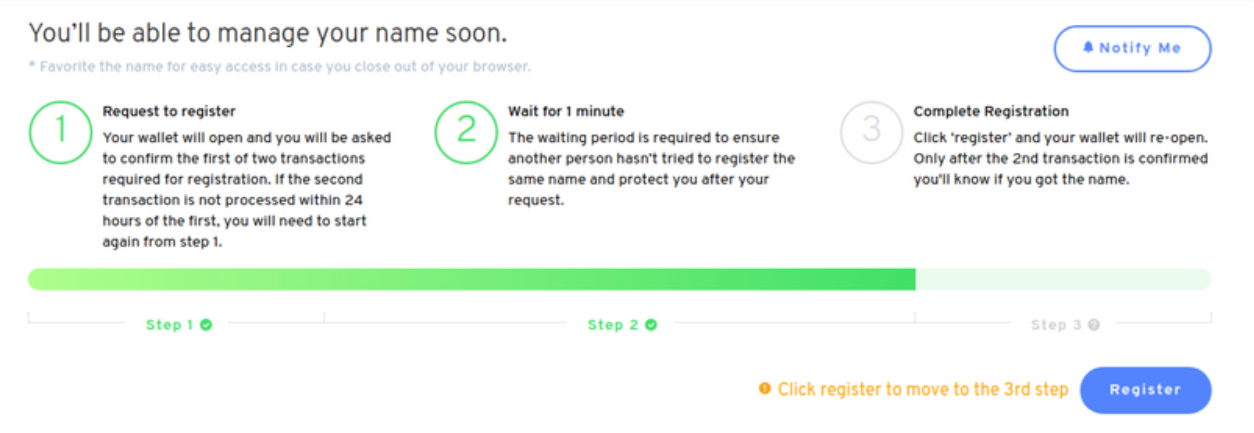
5.Upon completing the waiting period, you'll notice a line of orange text prompting you to click a " Register " button to proceed to the next stage. Click on the blue “Register” button. Submit the transaction, and once it is confirmed, your ENS is registered!
Now that you know how to get an ENS domain let’s see how to host an ENS domain with your Static Site using Spheron Network!
How to connect your ENS Domain with the Static Site on Spheron Network
Follow these steps to integrate an ENS domain with your Static Site on the Spheron Network.
Step 1: Create a Free Spheron Network Account
Visit Spheron Network: https://spheron.network/
On the Spheron homepage, locate and click the "Free Trial" button.
You'll be directed to a login/signup page. Choose your preferred authentication method: GitHub account, GitLab account, or Bitbucket account.
Follow the provided prompts to authenticate your chosen account securely. This step ensures safe access to the Spheron Network platform.
After successful authentication, you'll be guided to a confirmation page confirming the completion of your account setup.
Step 2: Create an Organization
Upon logging in, you'll be directed to a page to create your organization's name, username, and Avatar. Ensure the "Static Site" option is selected from the drop-down menu at the top right corner. And click “Save”.
Next, you'll be taken to a new page. Click the "New Project" button.
Step 3: Deploying your Static Site With Spheron Platform UI
Next, You will see a new page. Select your preferred Git provider from the options and authorize Spheron to access your Static Site's repository.
Choose your App repository from the list of available repositories. You can use many popular frameworks, like Gatsby, Hugo, Next.js, React, Vue, Vanilla JS, etc. We have specific guides for each framework to help you to prepare your site.
Select the protocol you want to use for deployment. As of now, Spheron supports Arweave, Filecoin, and IPFS.
The next step is to add build parameters. Spheron can auto-detect the required build parameters from the inputted framework, but you can find advanced settings/configurations and a detailed explanation in the guides according to frameworks.
Click the "Deploy" button to initiate the deployment process.
That's it! Your Static Site will now be deployed to the selected protocol using the Spheron Platform UI.
Note: The first time you want to deploy your project, you need to do it manually through the dashboard. But after that, Spheron makes things easier. From the next time onwards, when you make any new changes and save them, Spheron will automatically trigger a new build and deployment of your project with those changes. This happens every time you push new changes to your project on GitHub, GitLab, or Bitbucket.
Step 4: Connect your ENS domain with Spheron Network
Follow these steps for configuring your ENS domain on the Spheron Platform:
1. Open your project in the chosen platform.
2.Proceed to the "Domains" tab and click on “ENS Domain” at the left sidebar to access the "Configure your ENS Domains/Subdomains" segment.
3. Enter your ENS Domain name.
4. Select a deployment you want your domain to point to and Click "Add." You will see the selected configuration on the screen.
5. With Spheron, you can update your ENS content hash directly from the app. Make the required changes, Click "Update", and confirm the transaction on Metamask to update the content hash. You can verify it in your ENS Domain Manager.
6. To manually update the content hash of your ENS domain, Go to your ENS dashboard and Update your content hash with the CONTENT provided by Spheron.
7. Click "Verify" to verify the update, and Spheron will verify the records for you.
Congratulations! You have now successfully created and connected an ENS domain with your deployed Static Site on the decentralized network.
Benefits of Using ENS Domain with Spheron Network
Deploying your Static Site with Spheron offers many benefits, including:
Custom deployment environment: Spheron provides a custom deployment environment for Static Sites, which can be tailored to your needs. This means you can choose the specific configurations that best suit your project. This helps reduce bugs and issues that arise due to environment inconsistencies.
Continuous deployment: Spheron offers continuous deployment, which means your application will be automatically deployed whenever you push changes to your repository. This can significantly speed up the development process and allow for quick rollouts of new features and bug fixes to your app.
Preview Mode: Static Sites deployed on Spheron can be viewed in Preview Mode, which allows you to see how the app will look and function before it is deployed to a live environment
Static site rendering: Static Sites deployed on Spheron can take advantage of static site rendering, improving performance and SEO.
Custom domain: After deploying a Static Site on Spheron, it will automatically be assigned a .spheron.app domain. However, you can also add a custom domain of your choice.
Built-in SSL: Spheron provides built-in SSL encryption for all domains, which ensures that data transmitted between your app and your users' browsers is secure. This is especially important for apps that handle sensitive user data.
Developer-friendly features: Spheron offers various developer-friendly features like AI code generation, SpheronGPT, and scaling capabilities, enabling a seamless development experience.
Support and documentation: Spheron provides comprehensive documentation and support, helping you navigate any challenges you may face during deployment and development.
Benefiting with other Spheron features: By deploying your Static Site on Spheron, you can benefit from other features offered by the Spheron platform, enhancing the functionality of your app.
Conclusion
In conclusion, Ethereum Name Service (ENS) domains have emerged as a powerful tool in the decentralized realm, revolutionizing the way we interact with addresses, websites, and applications on the Ethereum blockchain. Combining ENS with the Spheron Network takes this experience a step further.
Combining a personalized, decentralized domain and Spheron's comprehensive web deployment platform opens doors to a new era of seamless development. With features like custom deployment environments, continuous deployment, preview modes, static site rendering, custom domains, built-in SSL encryption, and developer-friendly tools, Spheron empowers developers to create and iterate efficiently while ensuring security and performance.
By following the above guide, you're embarking on a journey toward a more accessible, secure, and user-centric web – a web where individuals truly own and control their online presence. So, seize this opportunity, empower your projects with ENS and Spheron, and become a part of the decentralized revolution shaping the digital landscape.
Resources
Spheron ENS Documentation: https://docs.spheron.network/static/projects/ens/
ENS Documentation: https://docs.ens.domains/