


Table of contents
- What is Spheron Network?
- What is Lava Network?
- How do you deploy Lava Node using Spheron Compute?
- Step 1: Create a Free Spheron Network Account
- Step 2: Creating an Organization
- Step 3: Deploying a Lava Node With Spheron Platform UI
- Step 4: Provision Your Node and Access the Shell
- Step 5: Create or Recover Your Wallet
- Step 6: Fund Your Wallet
- Step 7: Verify Network Synchronization
- Step 8: Register Your Validator
- Conclusion
This article delves into the seamless deployment process for a Lava Node using Spheron, a user-friendly platform simplifying node configuration and participation in the Lava ecosystem.
What is Spheron Network?
Spheron Network is a Web3 infrastructure platform that provides tools and services to decentralize cloud storage and computing. It allows audited data centers to join the Spheron marketplace. Spheron oversees the decentralized and governed nature of the infrastructure, ensuring permissionless access and heightened security for all users. Spheron Compute offers a feature-rich alternative to traditional cloud services at only one-third of the cost.
Spheron offers a Compute Marketplace, which allows users to set up valuable tools quickly and easily, whether they want to deploy databases, nodes, tools, or AI. With Spheron, you don't have to worry about the technical stuff, and you can focus on deploying your Node with ease. Spheron Network has also partnered with organizations like Shardeum, Avail, Elixir, Filecoin, Arbitrum, etc, to redefine access to it and promote a more decentralized, inclusive, and community-centric ecosystem.
Spheron provides features such as Private images, Auto-scale instances, Scale on demand, Real-time instance metrics, Faster GPUs, Free Bandwidths, Terraform Providers and SDKs, Instance health checks, activity, shell access, and more. Spheron provides add-on storage solutions for long-term data storage and edge bandwidth acceleration through its global CDN. With Spheron, you can easily set up your nodes in just a few minutes and enjoy low maintenance and operations costs and a great developer experience.
What is Lava Network?
Lava is the first modular data access layer for blockchains. It introduces specs: a modular primitive that lets contributors permissionlessly add support for new chains and data services to the base protocol. RPC is the first service supported by the protocol, but they are soon bringing further choices by integrating with indexing and API partners, such as Subsquid.
Data consumers send requests to Lava’s network of data providers (node operators), who join Lava to meet data demand. Lava creates dynamic, scalable markets around any blockchain data service. The protocol also creates crypto-economic guarantees around the quality of service across speed, uptime, and data accuracy.
By leveraging modular architecture and a peer-to-peer network of node operators, Lava creates a unified platform for accessing the multi-chain world.
How do you deploy Lava Node using Spheron Compute?
Deploying a Lava node on Spheron is a simple, streamlined process that does not require any DevOps knowledge!
Step 1: Create a Free Spheron Network Account
1. Visit Spheron Network: spheron.network
2. On the Spheron homepage, locate and click the "Free Trial" button.
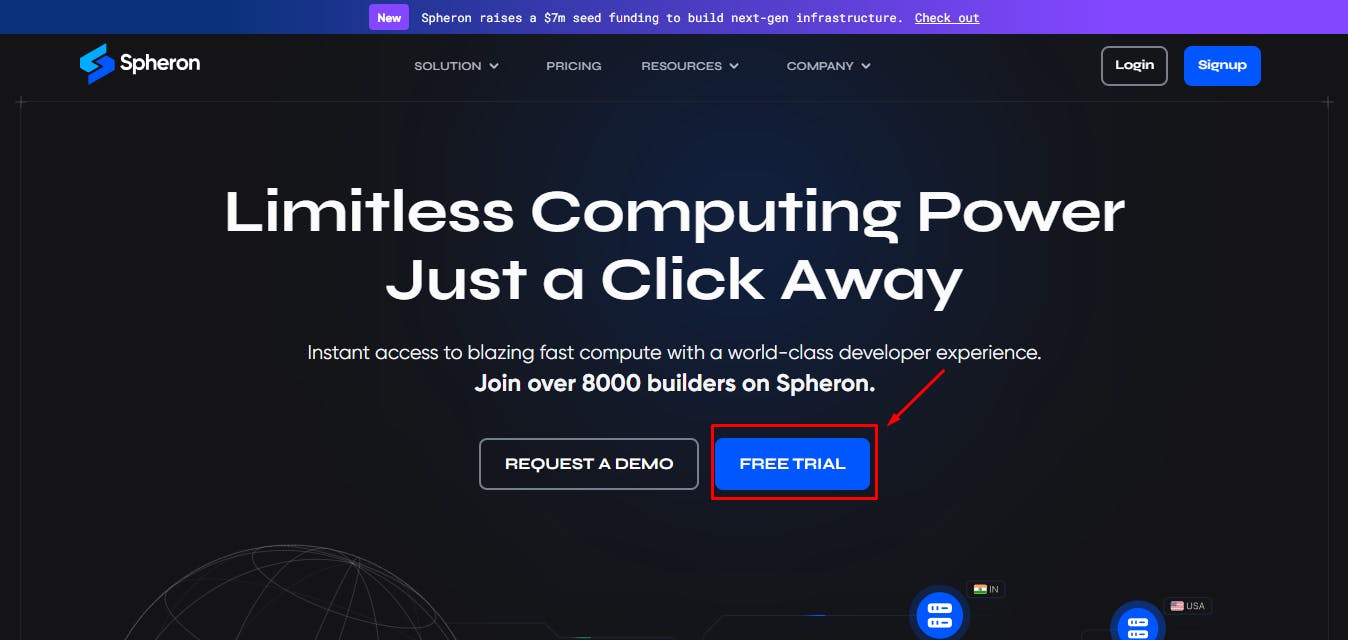
3. You'll be directed to a signup page. Choose your preferred authentication method: Web2 (GitHub account, GitLab account, or Bitbucket account) or Web3 (Ethereum).
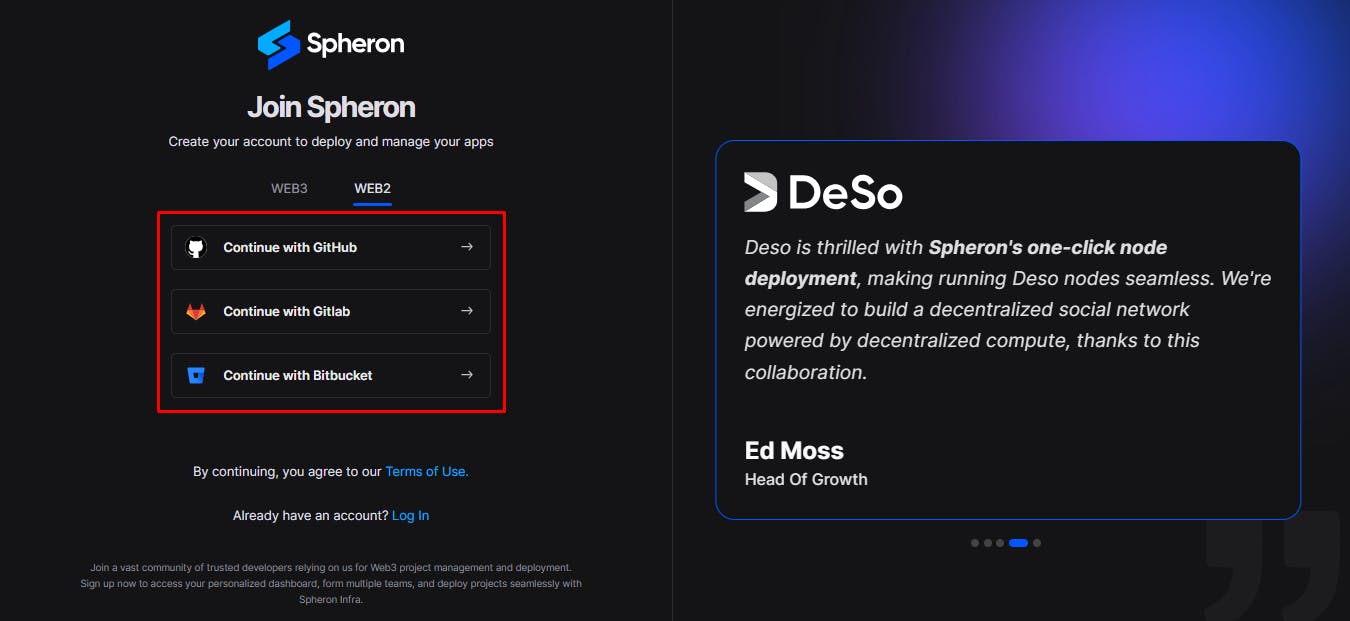
4. Follow the provided prompts to authenticate your chosen account securely. This step ensures safe access to the Spheron Network platform. After successful authentication, you'll be guided to a confirmation page confirming the completion of your account setup.
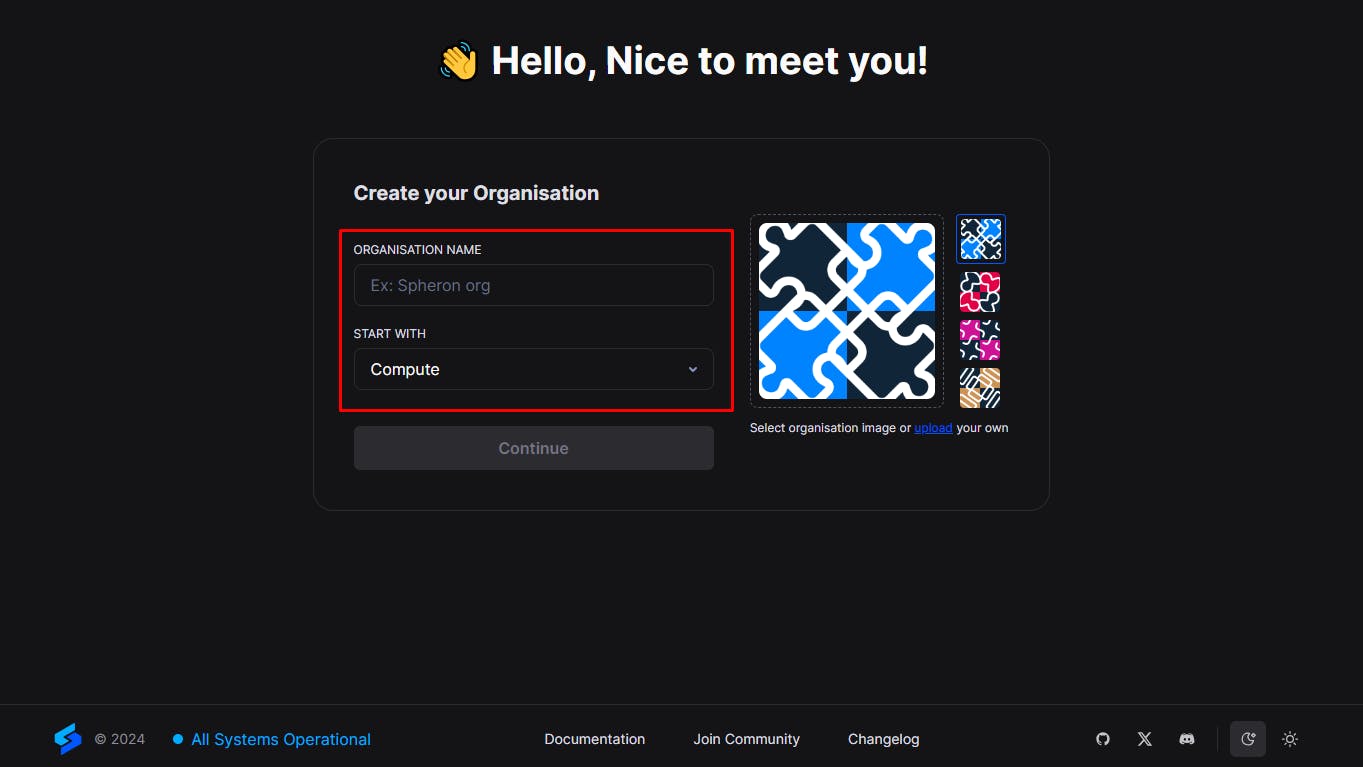
Step 2: Creating an Organization
1. Upon logging in, you'll be directed to the Create Organization page, where you can give your organization name and choose Avatar. Ensure the "compute" option is selected from the drop-down menu of the "Start With" option. Click “Continue”.
2. Next, you'll be taken to a new page. Click the "Create New Projects" button. Add 'Project Title' And 'Project Description' and Click Create.

Step 3: Deploying a Lava Node With Spheron Platform UI
Follow these steps to deploy a Lava Node:
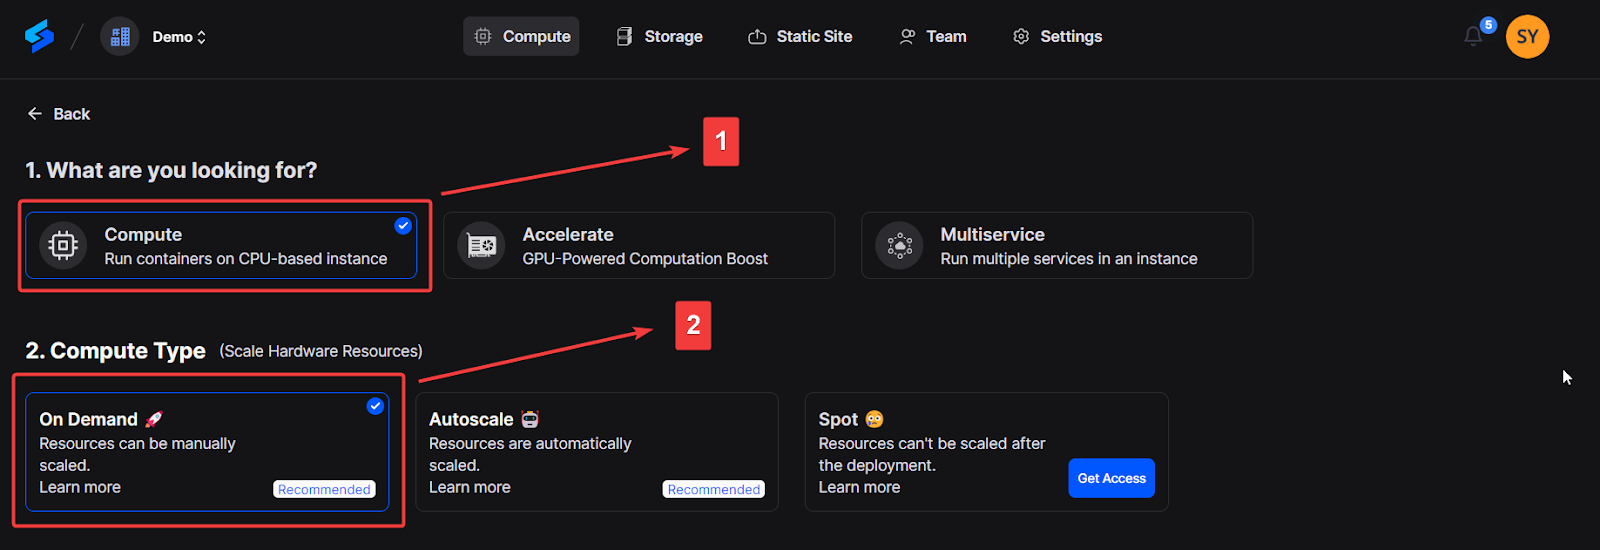
1. Choose "Compute" to use CPU-based instances for running containers.
2. Choose your desired Compute Type option under Compute Type.
NOTE: Please schedule a team call to gain early access to the "Spot" Type.
3. Click "Start from Marketplace App" and Select "Lava Network" from the marketplace.

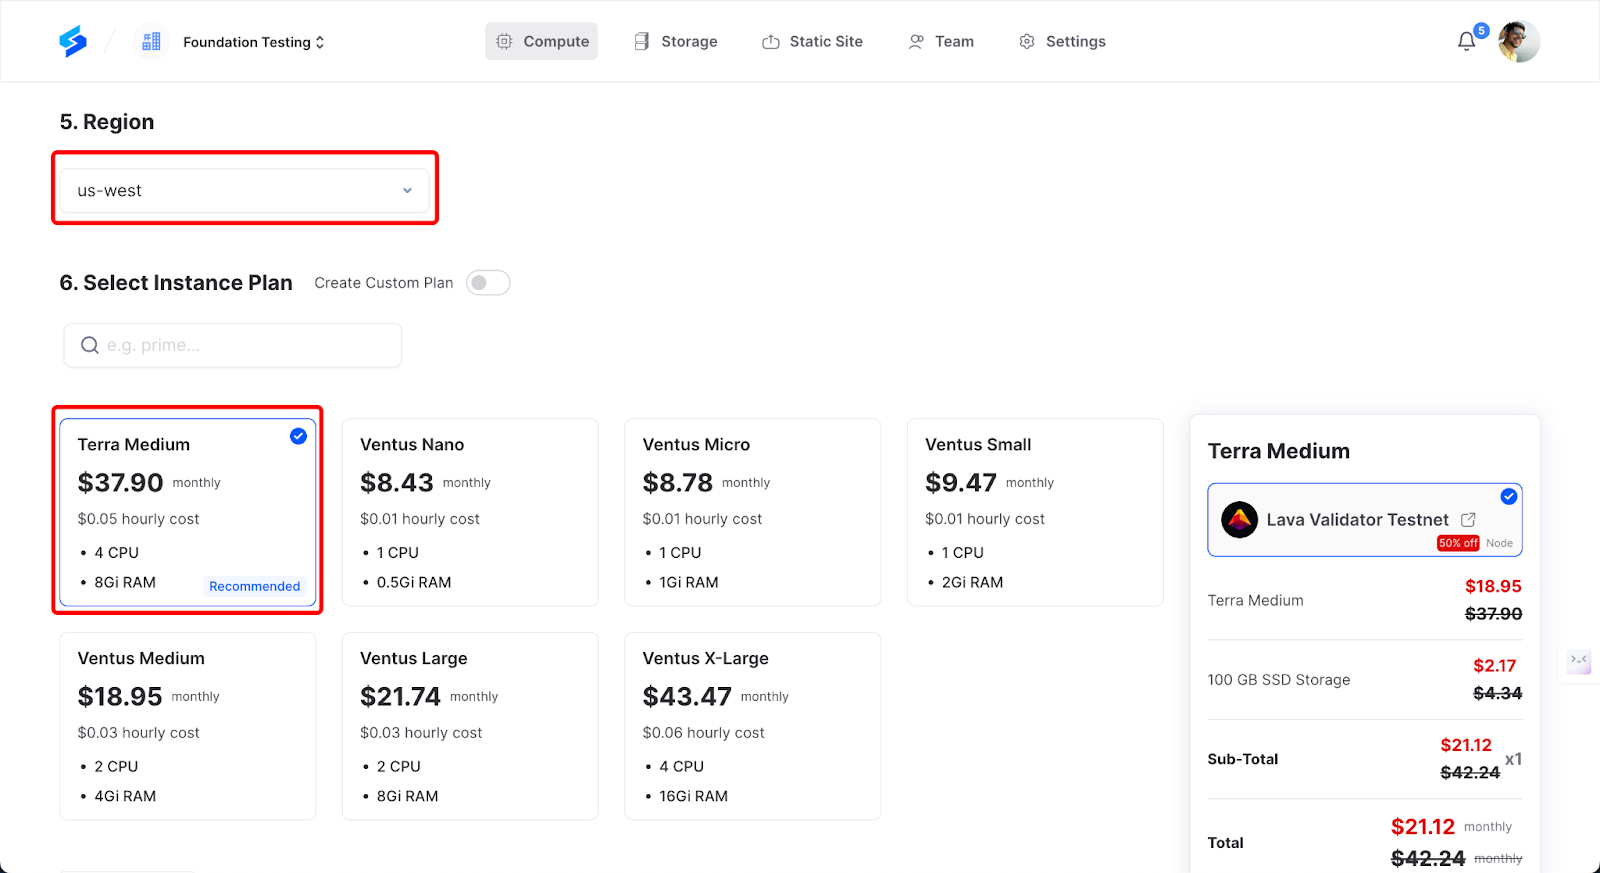
4. Select Region: Select your preferred region for deployment. Choosing a region closer to you. This can improve performance and reduce latency. US-West has a higher chance of deploying everything successfully. You can start from the US-West option.
5. Next, Choose an instance plan that aligns with your requirements. Spheron will recommend a suitable plan according to the Lava template, but you can customize it from available plans or choose to 'Create Custom Plans.'
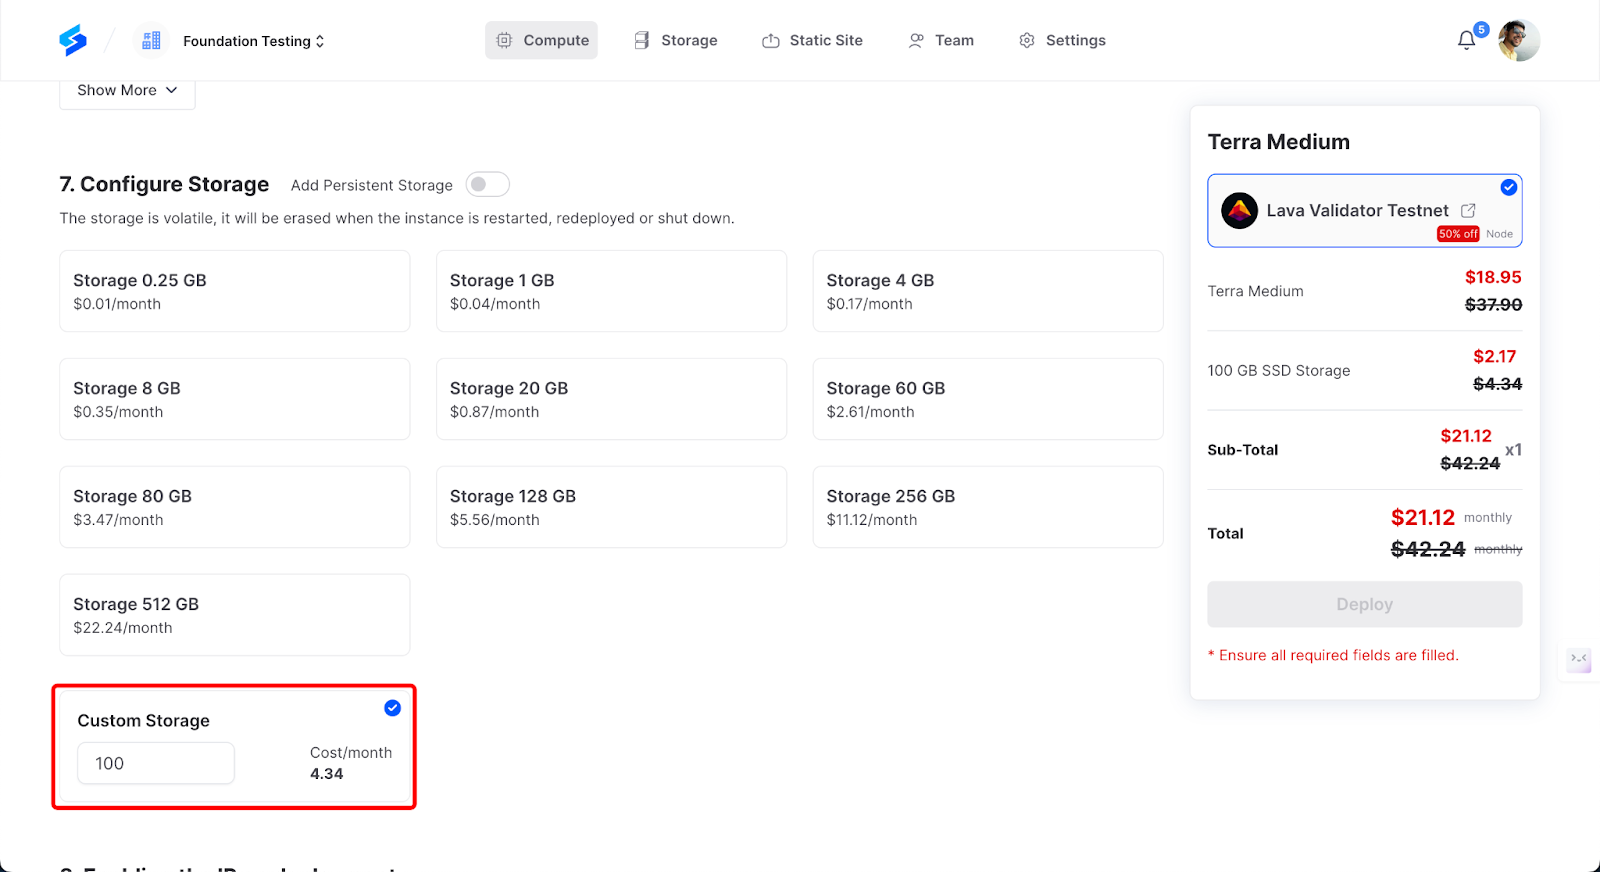
6. Next, Configure storage:
You have to choose storage from the available options or the custom storage option that fits your needs. This storage will be volatile and is erased when the instance is restarted, redeployed, or shut down. Additionally, you get the option to choose Persistent Storage.
- Next, go to the configuration. In the ‘Template Configuration’ section, you will need to add a wallet address. you'll be asked to provide a unique identifier for your node, known as a "Moniker." Think of the Moniker as a nickname for your node that will help you identify it on the blockchain network.
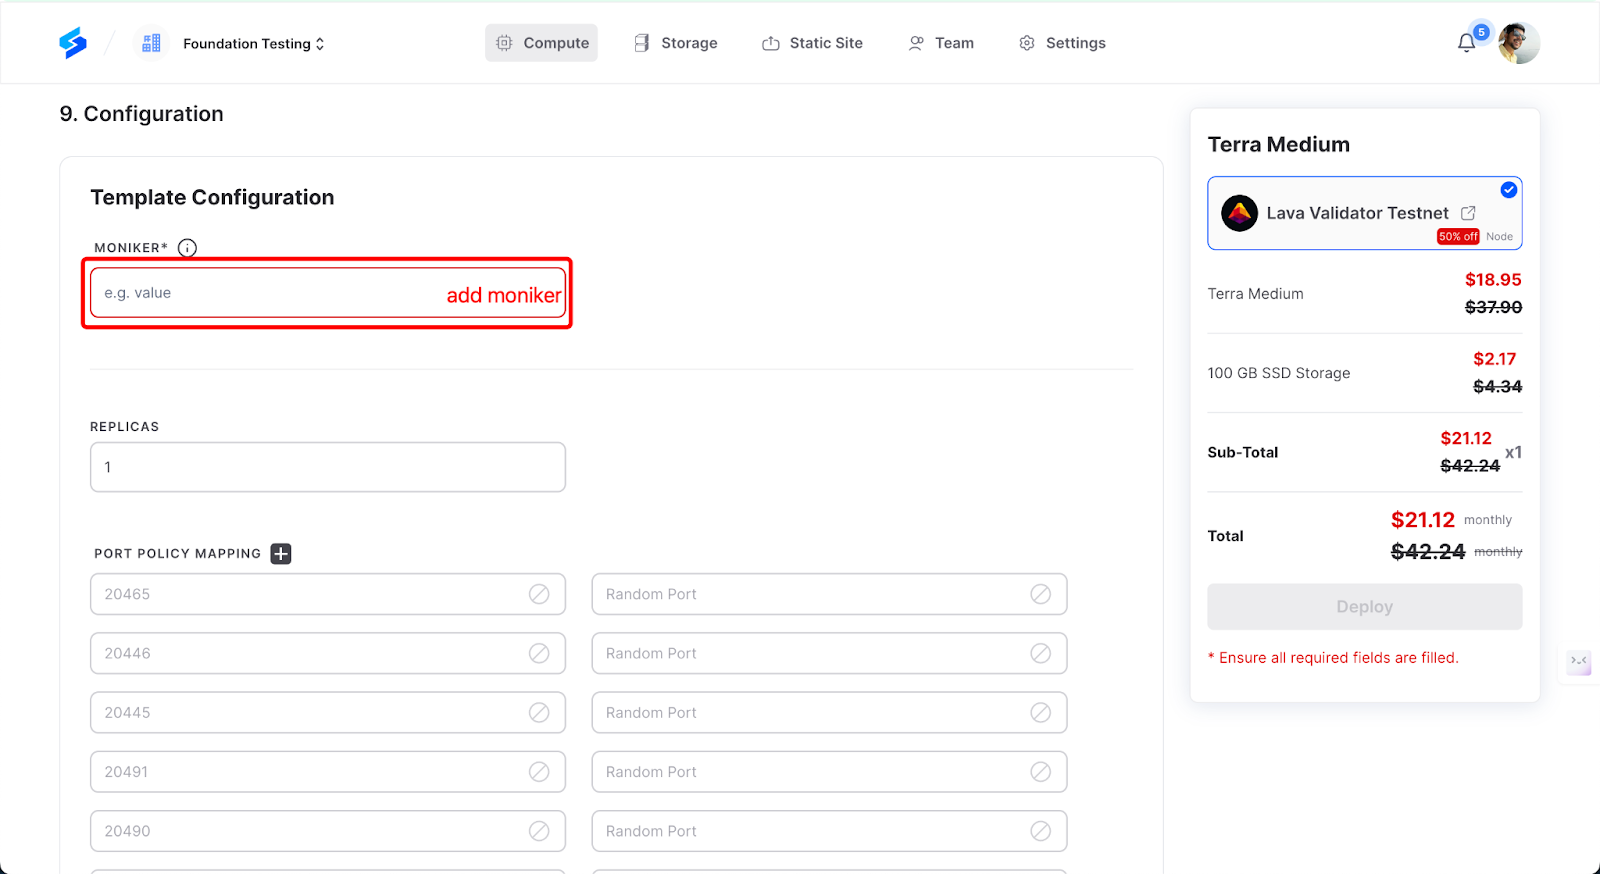
Why is Moniker important?
Once your node is set up and running as a validator, you can view its status and activity through the Lava Validator Dashboard at this link.
Step 4: Provision Your Node and Access the Shell
1. Click the "Deploy" button to deploy the node successfully.
2. Wait for your node to be fully set up. After it's provisioned, you'll see an option called ‘Overview’ in the dashboard; click on it to see all the details of the deployed node on Lava Network.
3. Now, Click on the deployed lava-validator-testnet and go to 'Shell Command.'
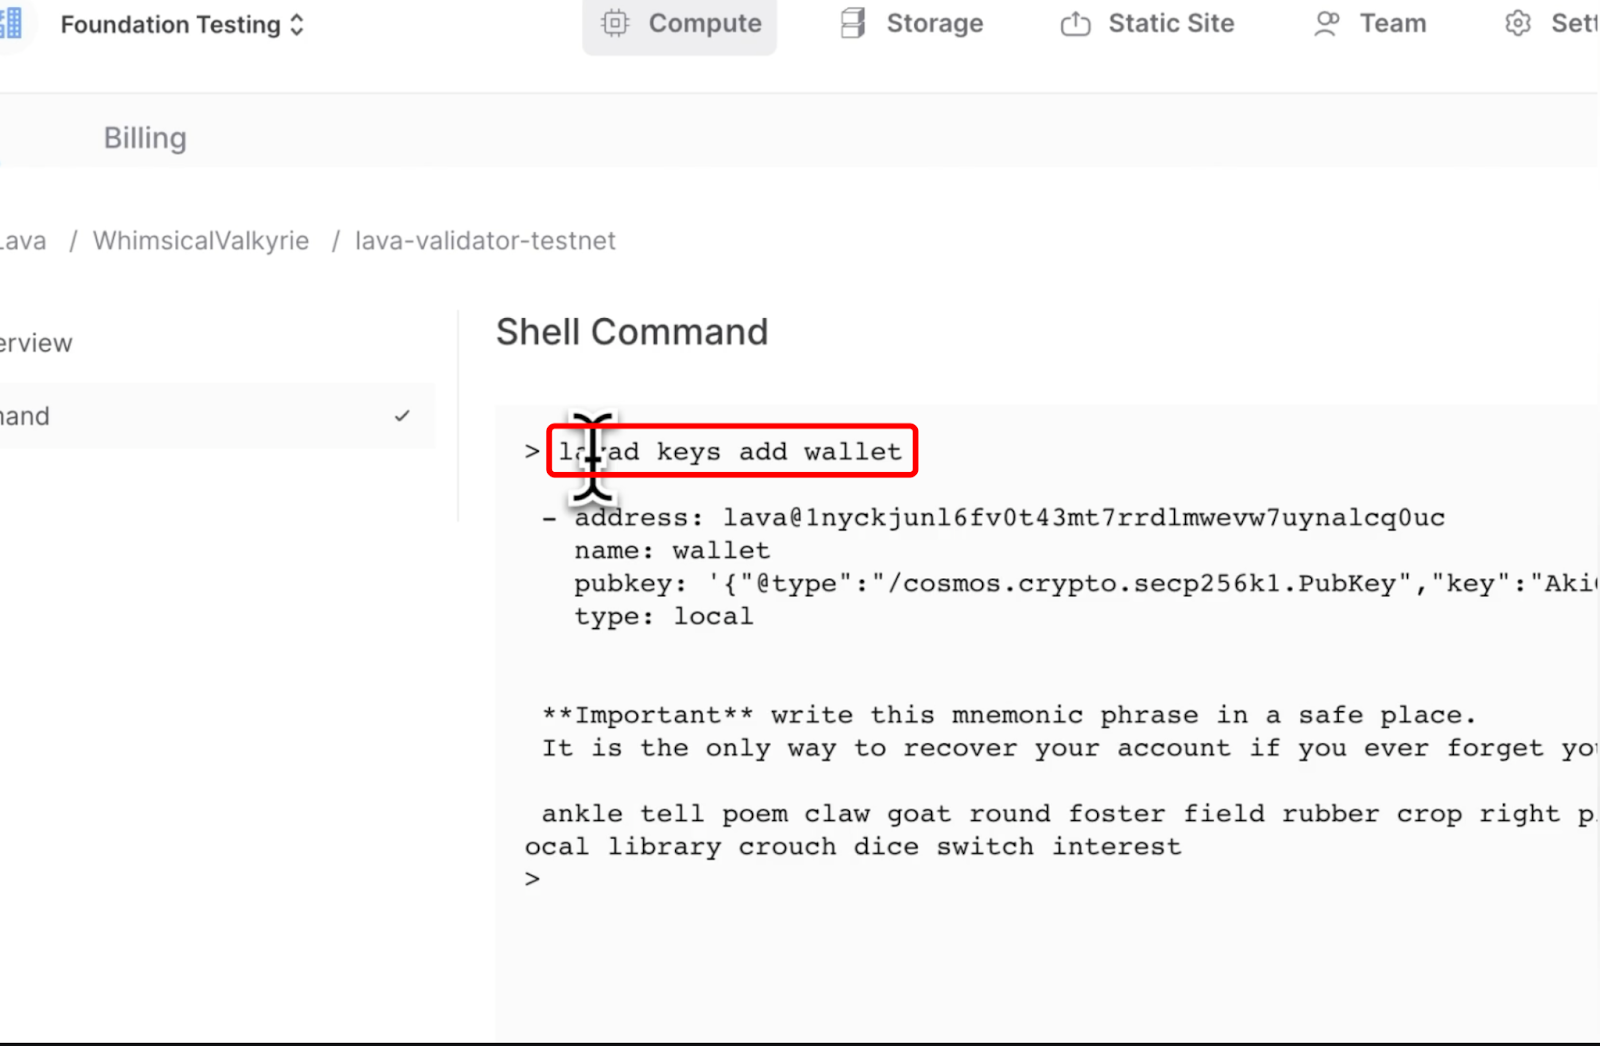
Step 5: Create or Recover Your Wallet
1. To create a new wallet type in the Shell:
lavad keys add wallet
2. To recover an existing wallet, use:
lavad keys add wallet --recover
Then, enter your mnemonic phrase when prompted.
Step 6: Fund Your Wallet
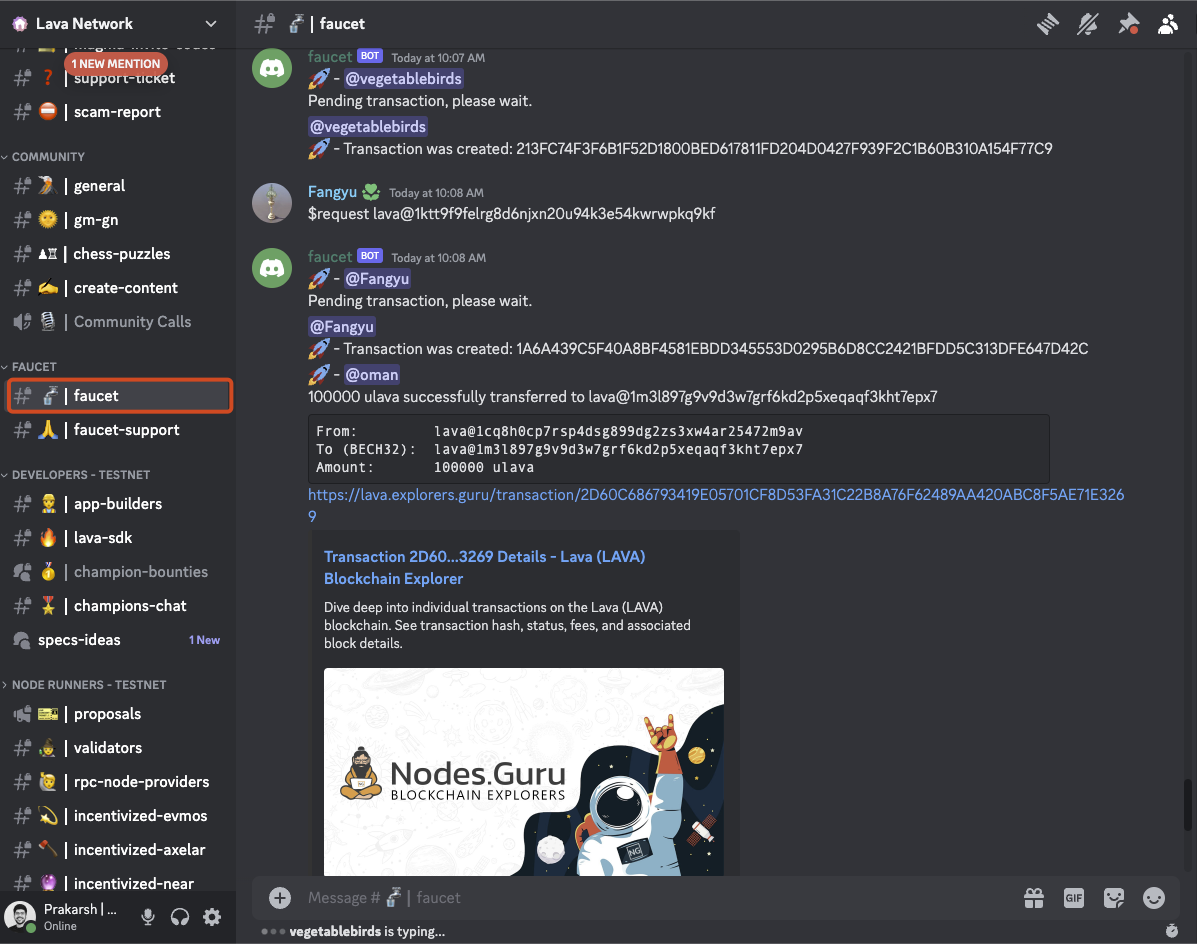
1. To receive funds, visit the #faucet channel on the official Lava Network Discord server. Here, you can request funds by sharing the address you previously created.
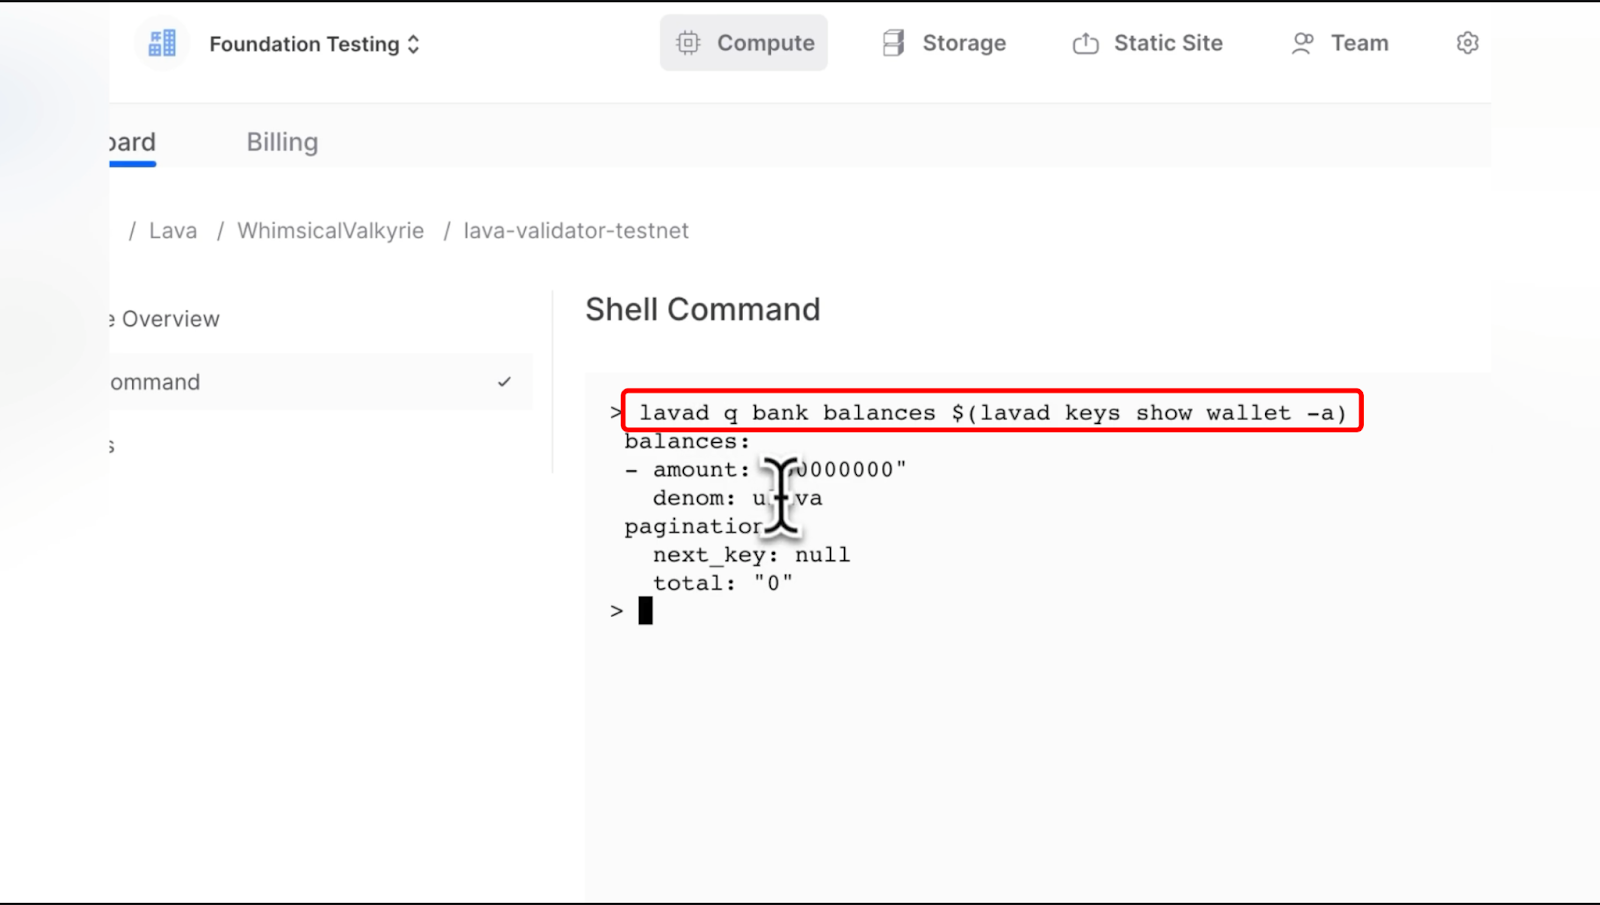
2. Check your wallet balance using:
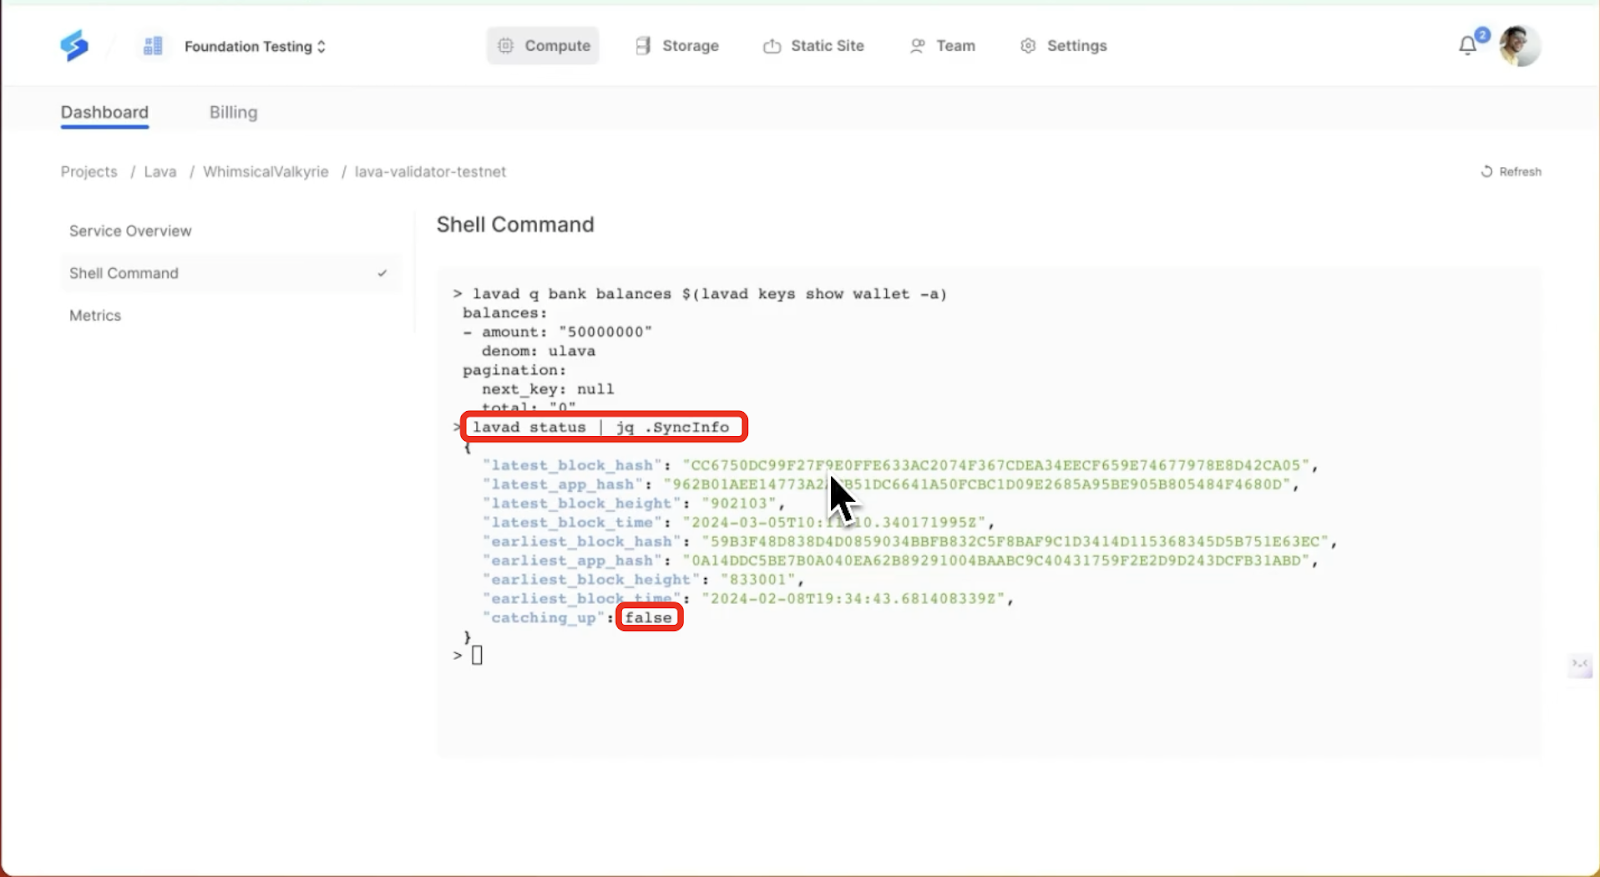
lavad q bank balances $(lavad keys show wallet -a)
Make sure you have at least 100000ulava tokens.
3. Your node might still be syncing with the blockchain if you don't see a balance. Wait until the catching_up status is false.
Monitor your wallet on the Lava Explorer: Visit Lava Explorer and enter your wallet address to keep an eye on your transactions and balance. This step is crucial for ensuring your wallet has been successfully funded and correctly reflects the blockchain transactions.
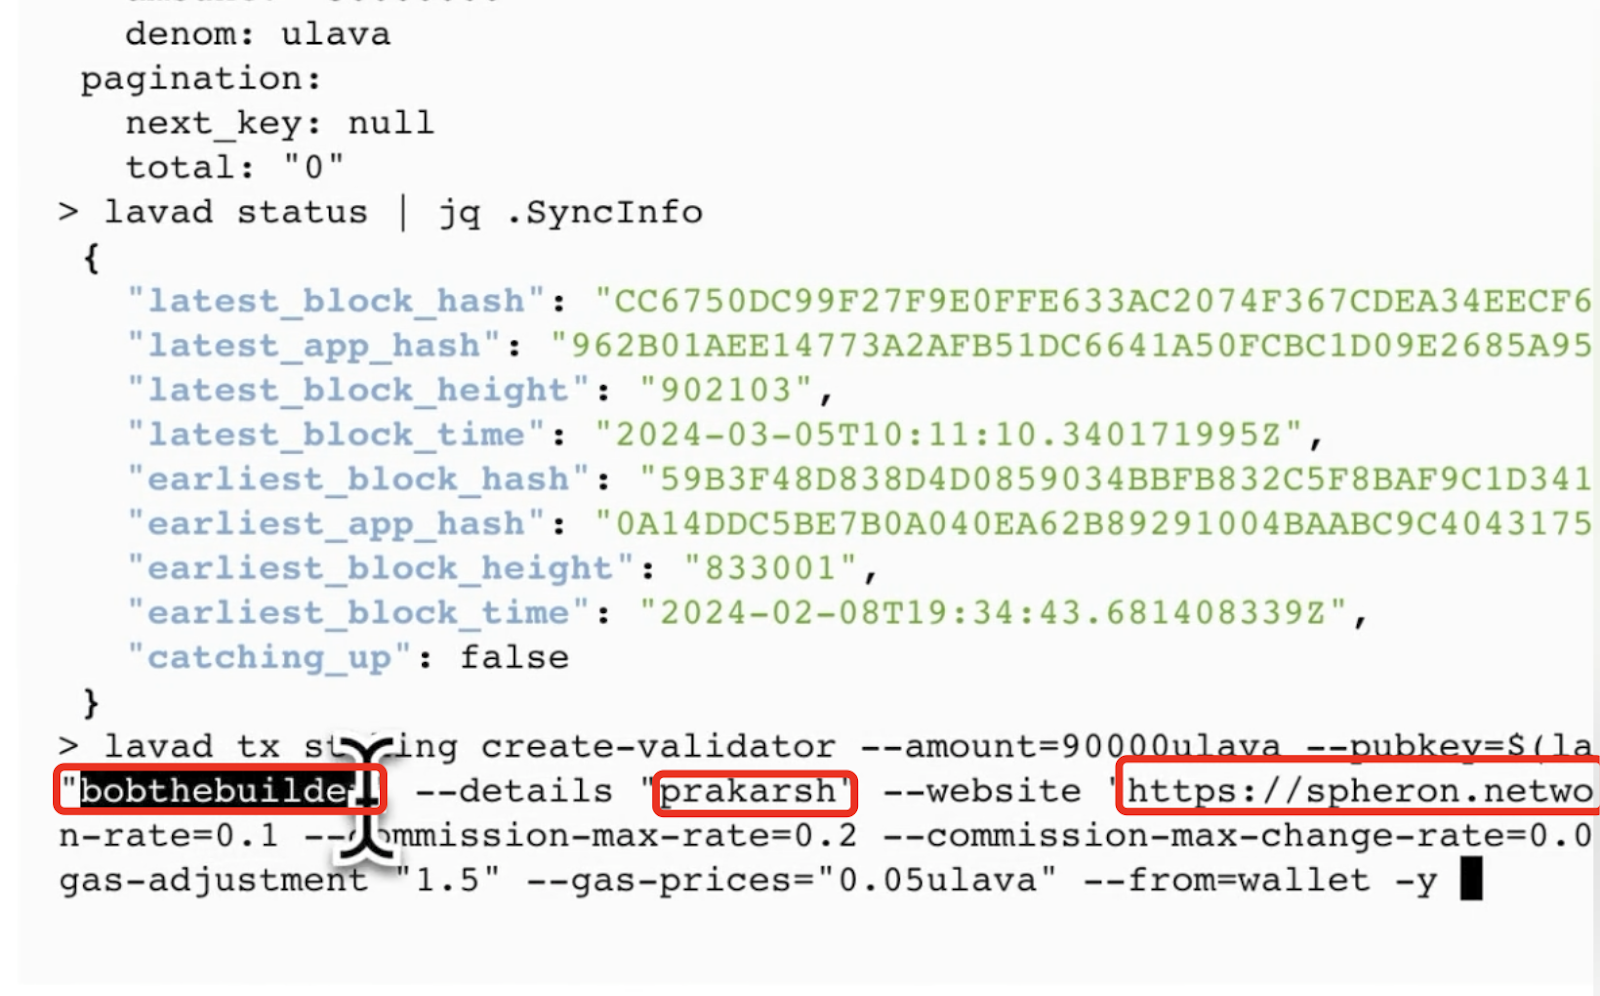
Step 7: Verify Network Synchronization
Check the synchronization status with:
lavad status | jq .SyncInfo
Proceed when catching_up turns to false.
Step 8: Register Your Validator
Use the following command to create your validator, replacing placeholders with your information:
lavad tx staking create-validator --amount=90000ulava --pubkey=$(lavad tendermint show-validator) --moniker "YOUR_MONIKER_NAME" --details "YOUR_DETAILS" --website "YOUR_WEBSITE_URL" --chain-id=lava-testnet-2 --commission-rate=0.1 --commission-max-rate=0.2 --commission-max-change-rate=0.05 --min-self-delegation=1 --gas="auto" --gas-adjustment "1.5" --gas-prices="0.05ulava" --from=wallet -y
Customize the command with your details: Replace YOUR_MONIKER_NAME, YOUR_DETAILS, and YOUR_WEBSITE_URL with your information.
Now make sure you see the validator details:
lavad q staking validator $(lavad keys show wallet --bech val -a)
Wait a few minutes after executing this command before checking your node on the Lava Validators List.
Conclusion
In conclusion, deploying a Lava Node using Spheron Network is a straightforward process that can be completed in just a few steps. With Spheron, users can easily set up a Lava Node without extensive technical knowledge, making it accessible to a wider range of participants. Following the steps outlined in this guide, users can quickly and easily deploy their Node and contribute to the network.